Zaris Headers
- Home
- Zaris Features
- Zaris Headers
Administrator Guide - Zaris Headers
The ZARIS Headers feature allows administrators to create highly visible, customizable information cards that appear at the top of a record’s Detail View. These smart headers highlight the most important fields, giving users an instant overview without scrolling through the entire record. By surfacing critical business information at a glance, ZARIS Headers improve navigation, increase productivity, and help teams make faster decisions while working inside the CRM. Modern CRM interfaces commonly use customizable header areas to improve usability and surface key information for users.
Configuring a New Header
Step 1: Access the Module
Navigate to:
Menu → Settings → CRM Settings → Other Settings → Zaris Headers
Click Add Header to create a new header.
Step 2: Module Selection
Select the primary module where the header will appear.
For example:
Choose Contacts to display a contact’s critical information at the top of their record.
Choose Opportunities to highlight deal value, stage, and owner details.
This determines where the header will be visible in the CRM interface.
Step 3: Field Selection
Choose the data field you want the header to display.
Example: Display “Deal Amount,” “Priority,” or “Customer Type.”
This field’s value will appear dynamically on the header, giving users instant insight into essential data.
Step 4: Related Module Support (Key Feature)
Zaris CRM supports cross-module display — allowing headers to show data from related modules.
For example:
On a Ticket record, you can display the Organization’s Contact Number or Email from the related Organization module.
This functionality ensures users have immediate access to connected information without navigating across modules.
Step 5: Appearance Settings
Define how the header looks for quick recognition:
Header Title: The label displayed on the header (e.g., “Ticket Priority”).
Icon/Label: Add an icon for visual clarity.
Color: Assign a background color to make the header stand out (e.g., red for urgent items).
These options help organize data visually and draw attention to what matters most.
Step 6: Sequence
Use the Sequence number to control the order in which multiple headers appear.
Lower numbers appear first (top position).
Adjust sequences to prioritize the most important information.
Step 7: Status
Toggle the Active switch to enable or disable the header without deleting it.
This allows flexibility in managing seasonal or temporary headers.

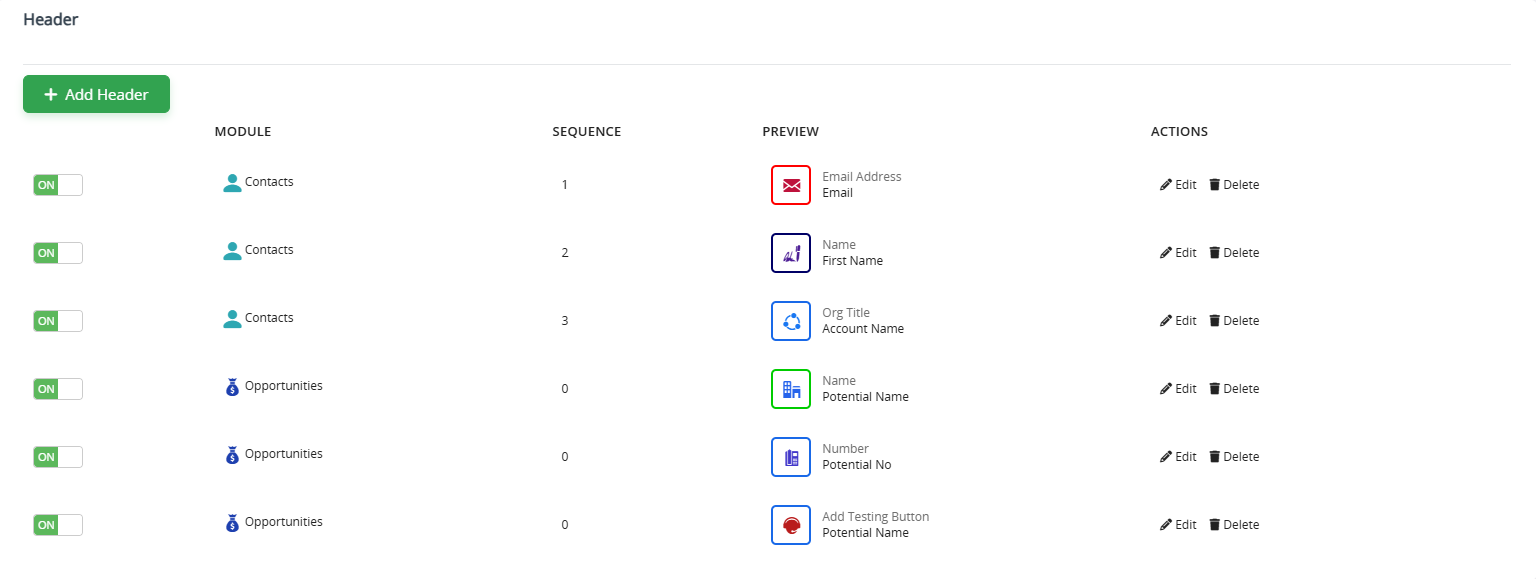
Management and Best Practices
Managing Headers
After creating headers, administrators can manage them from the Custom Headers Management Screen, which lists all configured headers with key details such as:
Module Name
Sequence Number
Preview (to see how the header will appear on a record)
Actions Available
For each header, the following administrative actions are available:
Toggle ON/OFF: Quickly activate or deactivate headers.
Edit: Modify header appearance, field, or module settings.
Delete: Permanently remove headers that are no longer needed.
This central view helps maintain consistent header design and organization across the CRM.
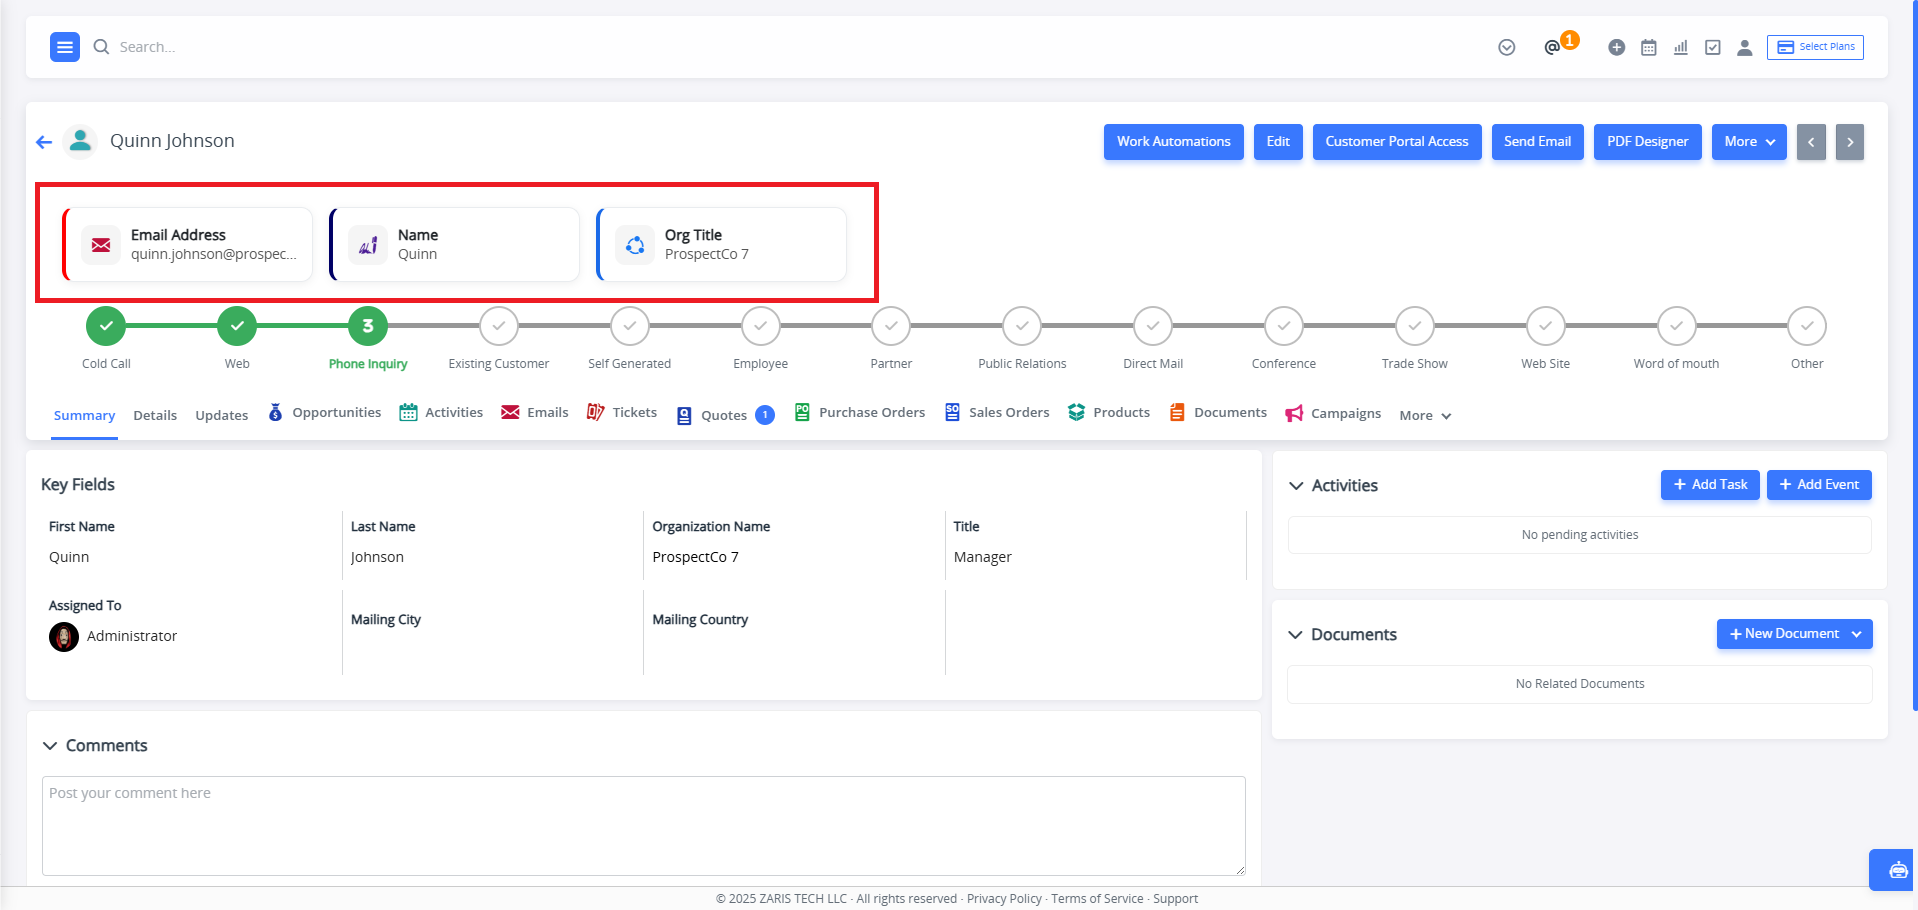
How does a Header work?
The headers created using Custom Headers extension uses the free space in the header area and displays fields in the form of headers so that you can immediately notice the information given in them.
Once you configure a header for a module, and then visit a record from that module, it will display the specified field in that empty space. A custom header will consist of the colored icon, field name for which it’s created, and data from that field of this specific record.
Why Use ZARIS Headers?
Every second counts when users are managing customers, opportunities, projects, or support requests. ZARIS Headers eliminate unnecessary scrolling by presenting the most valuable information at the top of every record.
Administrators can tailor headers for different modules, ensuring sales teams, support agents, and managers immediately see the data most relevant to their work. This streamlined interface improves usability, accelerates decision-making, and enhances the overall CRM experience.
Key Benefits of ZARIS Headers
The ZARIS Headers feature helps users quickly identify important information by displaying essential record details in a prominent header section. This improves user experience, reduces navigation time, and provides instant visibility into critical CRM data.
Instant Record Overview
Display the most important record information at the top of every Detail View with ZARIS Headers. Users can quickly understand customer, lead, project, or opportunity details without scrolling through multiple sections.
Improve User Productivity
Reduce the time spent searching for key information by placing essential fields in customizable ZARIS Headers. Teams can work faster and make informed decisions with immediate access to critical data.
Customize Information for Every Module
Configure ZARIS Headers for different CRM modules to display the fields that matter most for your business. Deliver a personalized user experience while improving workflow efficiency across departments.