Buttons
- Home
- Zaris Features
- Buttons
Administrator Guide - Custom Buttons Module
The Custom Buttons module in Zaris CRM enables administrators to create module-specific action buttons that perform instant updates or automate processes. These buttons streamline user operations by minimizing manual navigation and repetitive edits.
Go to Menu → Settings → Other Settings → Buttons
Configuring a New Custom Button
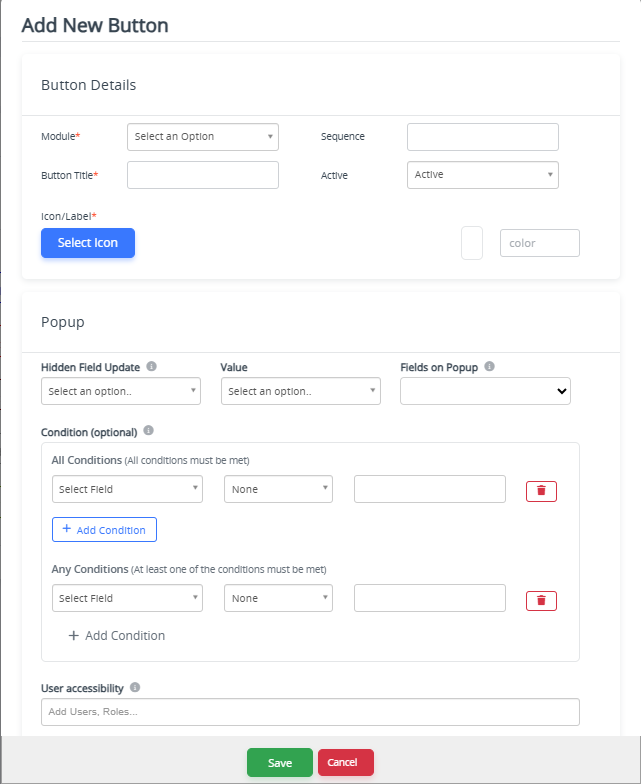
Step 1: Button Details
Fill out the essential details on the Add New Button form:
Module: Select the CRM module where the button will appear (e.g., Leads, Opportunities, Projects).
Button Title: Enter the display name of the button (e.g., Approve Deal, Update Address).
Icon/Label: Optionally add an icon or label for visual identification.
Active Status: Enable this to make the button visible and usable immediately after creation.
Step 2: Popup Configuration
Define the popup interface that appears when users click the button:
Fields on Popup: Choose which fields will appear in the popup for user interaction.
Example: For an “Update Address” button, select only Street, City, State, and ZIP Code fields.This configuration helps simplify workflows by showing only the fields needed for the specific task.
Step 3: Hidden Field Update
Use this setting to automate background updates when the button is executed:
Assign a Hidden Field (a field not shown to the user) and define its Value.
Example: Automatically update the Lead Status to Qualified when the user clicks Mark as Qualified.This allows key process transitions to occur without requiring user input.
Step 4: Conditions (All/Any)
Control button visibility or activation based on specific criteria:
Condition Type: Choose whether All or Any of the defined conditions must be met.
Example Condition: Show Approve Quote only if Quote Total < $10,000.
This ensures the button is context-sensitive and appears only in relevant scenarios.
Step 5: User Accessibility
Limit button access based on user hierarchy:
Define Users, Roles, or Groups who can view or execute the button.
This granular control maintains operational security and ensures that only authorized personnel can trigger sensitive actions.
Managing and Previewing Buttons
The Button Details dashboard lists all created buttons, giving administrators a centralized interface to manage them efficiently.
Management Options:
Each button entry includes the following administrative controls:
Status (Toggle ON/OFF): Activate or deactivate a button without deleting it.
Preview: View how the button will appear in the CRM interface before deployment.
Sequence: Adjust the order in which multiple buttons appear on the record view.
Fields: Review or modify which fields are shown in the popup or automatically updated.
Conditions: Edit the logic that governs button visibility and activation.
Edit/Delete: Update or remove buttons as needed.
Administrators can also quickly verify which modules have active buttons, their assigned actions, and who has access to them ensuring full visibility over automation behavior.
